Hey everyone, Louis here! Get ready to dig into the most adorable (and delicious) Easter treat ever: Dirt Cups! These aren’t your grandma’s desserts; we’re taking a childhood classic and giving it a vibrant, Easter-themed makeover. Think layers of rich chocolate, crunchy cookie ‘dirt’, squirmy gummy worms, and sweet candy carrots popping out of the top. It’s a mini edible garden in a cup, perfect for impressing your brunch party guests or delighting the little bunnies in your life.
These DIY Easter Dirt Cups are ridiculously easy to make, totally customizable, and guaranteed to be a hit. So, gather your eggs for an Easter quiz and let’s get our hands dirty (in the best way possible!). Forget those boring Easter cupcakes; we’re making memories one delicious layer at a time.
Why You’ll Love This Recipe
Seriously, what’s not to love? These Dirt Cups are:
- **Fun and Easy**: Perfect for getting the kids involved. No complicated baking skills required!
- **Deliciously Chocolatey**: Layers of creamy chocolate pudding and crunchy crushed cookies create an irresistible flavor combination.
- **Visually Stunning**: The gummy worms and candy carrots make these cups look like miniature edible gardens.
- **Perfect for Parties**: A sweet and whimsical dessert that’s sure to be a crowd-pleaser.
- **Customizable**: Swap out ingredients to suit your tastes and dietary needs.
Trust me; these Dirt Cups are the Easter dessert you’ve been searching for. They’re better than any chocolate bunny, and way more fun than plain old Easter cakes. Let’s dive in!
Ingredients You’ll Need
Here’s what you need to gather for your Easter Dirt Cup adventure:
- **Chocolate Sandwich Cookies (1 package, 14.3 ounces), crushed**: This forms the ‘dirt’ layer. Use your favorite brand!
- **Instant Chocolate Pudding Mix (1 package, 3.9 ounces)**: The creamy, chocolatey base.
- **Milk (2 cups)**: To prepare the chocolate pudding.
- **Whipped Topping (1 container, 8 ounces), thawed**: Adds a light and airy layer.
- **Gummy Worms**: For that authentic ‘dirt’ effect!
- **Candy Carrots**: The perfect Easter-themed garnish.
- **Clear Plastic Cups**: To showcase those beautiful layers. I’m using some I found on desserts on demand.
How to Make Your Own Easter Dirt Cups: Step-by-Step
Ready to get your hands dirty? Here’s how to assemble these adorable treats:
- **Prepare the Pudding**: In a bowl, whisk together the instant chocolate pudding mix and milk according to package directions. Let it set for a few minutes.
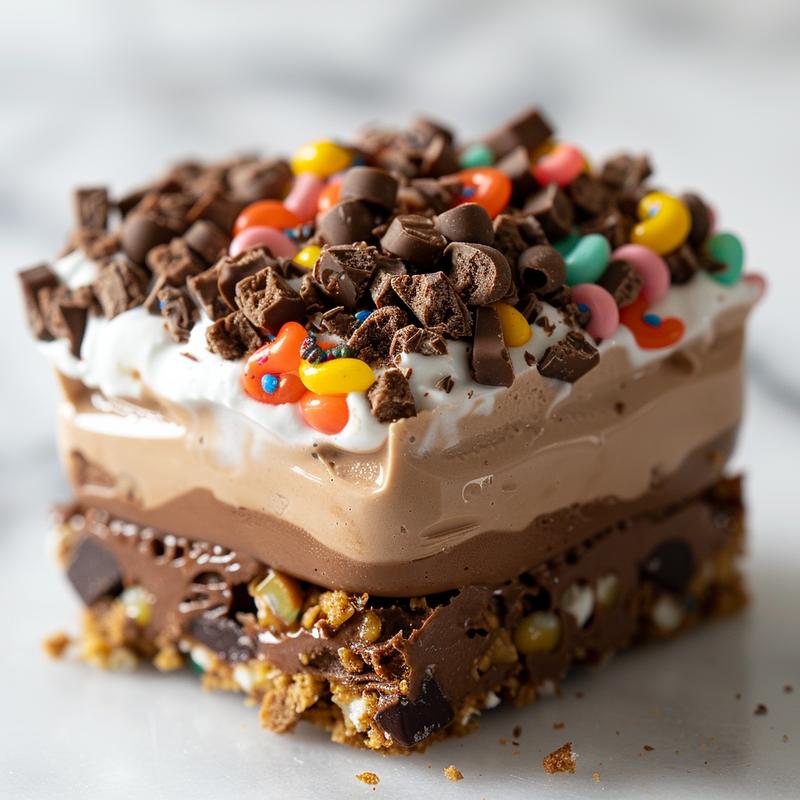
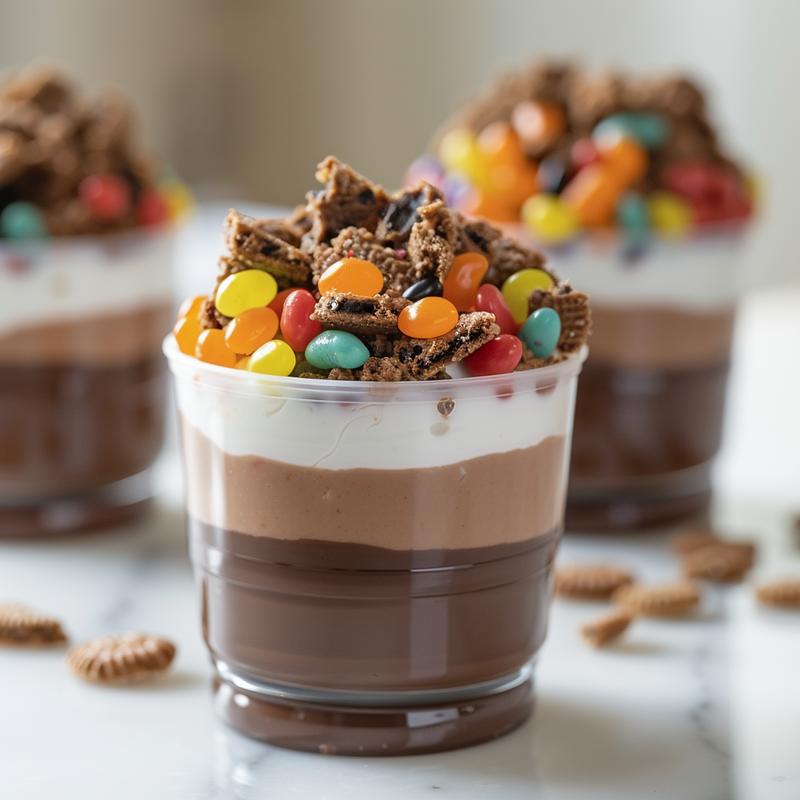
- **Layer the Cups**: In a clear plastic cup, start with a layer of crushed chocolate cookies.
- **Add Pudding**: Spoon a layer of chocolate pudding over the crushed cookies.
- **Top with Whipped Topping**: Add a layer of whipped topping.
- **Repeat**: Repeat the layers of crushed cookies, pudding, and whipped topping until the cup is full.
- **Garnish**: Top with gummy worms and candy carrots to create a ‘garden’ scene.
- **Chill**: Refrigerate for at least 30 minutes before serving. This allows the flavors to meld together.
And that’s it! You’ve just created a batch of irresistibly cute and delicious Easter Dirt Cups. Get ready for the applause!
Pro Tips for Perfect Dirt Cups
Want to take your Dirt Cups to the next level? Here are a few pro tips:
- **Crush the Cookies Finely**: Use a food processor or place the cookies in a resealable bag and crush them with a rolling pin. The finer the crumbs, the more realistic the ‘dirt’ will look.
- **Chill the Pudding**: Make sure the chocolate pudding is fully set before layering it into the cups. This will prevent it from becoming too runny.
- **Use Clear Cups**: Clear plastic cups are essential for showcasing the beautiful layers of your Dirt Cups.
- **Get Creative with Garnishes**: Don’t limit yourself to gummy worms and candy carrots! You can also use chocolate shavings, sprinkles, or even fake flowers (do not eat!) to decorate your Dirt Cups.
Common Mistakes to Avoid
Even though this recipe is super simple, here are a few common mistakes to watch out for:
- **Overfilling the Cups**: Leave a little space at the top of the cup to prevent the toppings from spilling over.
- **Using Warm Pudding**: Warm pudding will melt the whipped topping and make the Dirt Cups soggy.
- **Not Chilling Long Enough**: Chilling the Dirt Cups allows the flavors to meld together and the layers to set. Don’t skip this step!
Variations to Try
Want to mix things up? Here are a few fun variations:
- **Vanilla Dirt Cups**: Use vanilla pudding instead of chocolate for a lighter flavor.
- **Peanut Butter Dirt Cups**: Add a layer of peanut butter cups or peanut butter chips for a nutty twist.
- **Cookies and Cream Dirt Cups**: Use cookies and cream flavored pudding and top with crushed Oreo cookies.
- **Fruit Dirt Cups**: Add a layer of fresh berries or chopped fruit for a healthier option.
- **Easter Invitations**: Turn your dirt cups into a party favor for your Easter invitations. Attach a small tag with the recipe or a personalized message.
How to Store Leftover Dirt Cups
If you happen to have any Dirt Cups leftover (which is unlikely!), store them in the refrigerator for up to 2 days. Keep in mind that the crushed cookies may soften over time.
Frequently Asked Questions (FAQ)
- **Can I make these ahead of time?** Yes, you can make Dirt Cups a day in advance. Just store them in the refrigerator until you’re ready to serve.
- **Can I use sugar-free pudding?** Absolutely! Sugar-free pudding works just as well.
- **Can I use homemade whipped cream?** Yes, homemade whipped cream will add an extra touch of decadence.
- **Are these Dirt Cups gluten-free?** Not as written, but you can easily make them gluten-free by using gluten-free chocolate sandwich cookies.
Serving Suggestions
These Easter Dirt Cups are perfect for:
- **Easter Brunch**: A fun and festive addition to your Easter brunch spread.
- **Easter Dinner**: A light and refreshing dessert after a heavy meal.
- **Kids’ Parties**: A guaranteed hit with the little ones.
- **Classroom Treats**: A fun and easy treat to share with your classmates.
So there you have it! My ridiculously easy and utterly adorable Easter Dirt Cups recipe. I promise, these will be the talk of your Easter celebration. Don’t forget to snap a photo and tag me on social media – I can’t wait to see your creations! Happy Easter, everyone!
Remember, gather your friends, try this recipe, and let’s make some magic happen in the kitchen. These dirt cups are perfect for parties and are a fun and easy dessert that kids and adults alike will love. With pudding crushed cookies and gummy worms, it’s a sweet and whimsical treat that you absolutely have to try! And hey, if you’re looking for more Easter inspiration, check out my other recipes for Easter cupcakes and chocolate cups. Happy cooking!

DIY Easter Dessert: Dirt Cups 🥕🍫
Ingredients
Method
- Prepare chocolate pudding according to package directions using milk.
- Layer crushed chocolate cookies, chocolate pudding, and whipped topping in a clear plastic cup.
- Repeat layers until the cup is full.
- Top with gummy worms and candy carrots to resemble a garden.
- Refrigerate for at least 30 minutes before serving.
Notes
Loved this recipe? Save it to your favorite Pinterest board so you can easily find it later! ✨