

Welcome to Your New Favorite Dessert: The Ultimate Apple Crisp Recipe!
Let’s face it: there’s something undeniably magical about the combination of warm, tender apples and a crunchy, buttery topping. This apple crisp recipe is your ticket to dessert nirvana! Perfect for cozy evenings or special gatherings, this dish is as versatile as it is delicious. With just a handful of ingredients and a few simple steps, you can whip up a dessert that will make your friends swoon and your family cheer. Are you ready to dive into the world of flavor and fun? Let’s get started!
Why You’ll Love This Recipe
This isn’t just any apple crisp; this is a flavor bomb waiting to explode! Here are five reasons why this recipe will become your go-to:
- Quick and Easy: With a prep time of just 20 minutes, you’ll have this dish in the oven and your taste buds tingling in no time!
- Versatile Ingredients: Use whatever apples you have on hand—Granny Smith, Honeycrisp, or even a mix for extra flavor.
- Perfectly Balanced Flavors: The sweetness of the apples pairs beautifully with a crunchy topping, making each bite an adventure.
- Great for Sharing: This recipe serves a crowd, making it ideal for family dinners, potlucks, or cozy nights in.
- Customizable: Want to add some nuts or a dash of spice? Feel free to make it your own!
The Ultimate Ingredient Breakdown
Let’s talk about what you need to create this masterpiece! Here’s the lowdown:
Ingredients
- 4 large apples: Choose tart varieties like Granny Smith or Braeburn for the best flavor and texture.
- 1 cup granulated sugar: Sweeten up the apples; feel free to use brown sugar for a deeper flavor.
- 1 teaspoon ground cinnamon: Adds warmth and depth; consider adding nutmeg for an extra kick.
- 1 cup all-purpose flour: Forms the base of your topping and helps create that delightful crunch.
- 1 cup rolled oats: For texture; quick oats work too but avoid instant oats.
- 1/2 cup unsalted butter: Melted, for that rich, buttery flavor.
- A pinch of salt: Balances the sweetness and enhances overall flavor.
Ingredient Substitutions
- Apples: Any variety works, but for a twist, try pears or berries!
- Sugar: Substitute with maple syrup or honey for a natural sweetener.
- Butter: Coconut oil or vegan butter can be used for a dairy-free option.
Let’s Get Cooking: Step-by-Step Instructions
Time to bring your apple crisp to life! Follow these simple steps:
Step 1: Preheat Your Oven
Start by preheating your oven to 350°F (175°C). This ensures your apple crisp bakes perfectly!
Step 2: Prepare the Apples
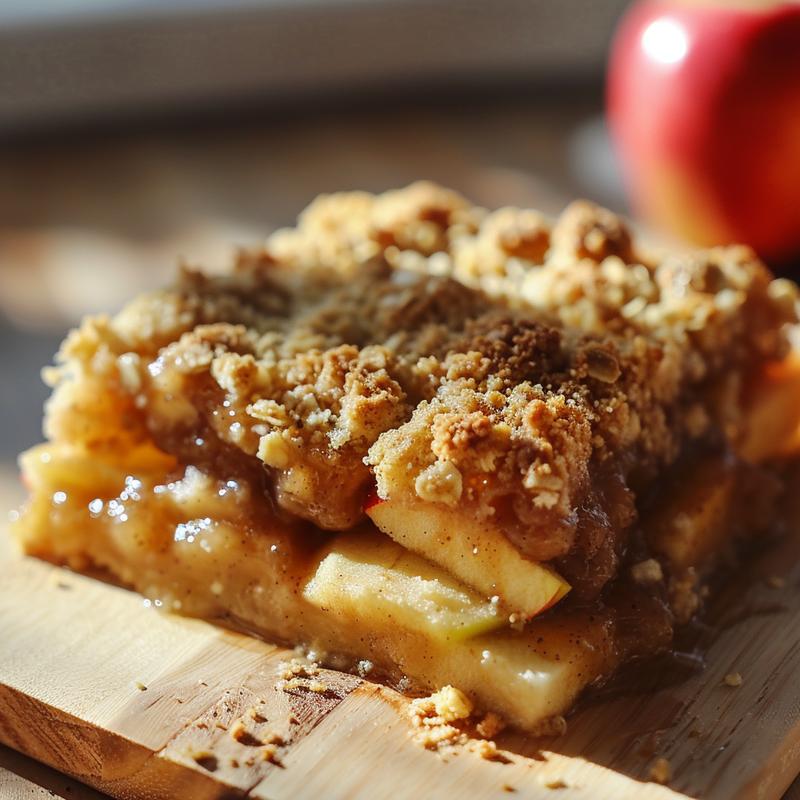
Peel, core, and slice the apples into thin wedges. In a large mixing bowl, combine them with sugar and cinnamon. Toss until evenly coated, then pour into a greased 9×13 baking dish.
Step 3: Make the Topping
In another bowl, mix the flour, oats, and remaining sugar. Stir in the melted butter until crumbly. Sprinkle this mixture generously over the apples.
Step 4: Bake to Perfection
Transfer to the preheated oven and bake for 40-45 minutes, or until the apples are bubbly and the topping is golden brown.
Expert Pro Tips for the Best Apple Crisp
Want to elevate your apple crisp game? Here are some insider tips:
- Mix It Up: Combine different kinds of apples for a more complex flavor profile.
- Let It Cool: Allow it to cool for 10-15 minutes before serving; this helps set the filling.
- Serve with Ice Cream: Nothing beats a scoop of vanilla ice cream melting over warm apple crisp!
- Don’t Overmix: When making the topping, just mix until crumbly; overmixing can lead to a doughy texture.
- Use a Glass Dish: A glass baking dish allows you to monitor the crispiness and browning.
- Layer It: For a fun twist, try layering in some caramel sauce or nuts for added flavor and texture!
- Double the Recipe: If you’re feeding a crowd, this crisp can easily be doubled; just use two baking dishes.
- Store Properly: If you have leftovers, cover them tightly and store in the fridge for up to 3 days.
Avoiding Common Mistakes
We all make mistakes in the kitchen, but here’s how to avoid the most common apple crisp blunders:
- Choosing the Wrong Apples: Avoid soft apples that turn mushy; stick to firm, tart varieties.
- Overbaking: Keep an eye on the crisp; you want a golden top, not burnt!
- Not Enough Topping: Make sure to generously cover the apples with the topping for that irresistible crunch.
Delicious Variations to Try
Feeling adventurous? Here are some creative twists on the classic apple crisp:
- Caramel Apple Crisp: Drizzle caramel sauce over the apples before adding the topping for a sweet twist.
- Nutty Apple Crisp: Add chopped pecans or walnuts to the topping for extra crunch.
- Spiced Apple Crisp: Incorporate ginger or nutmeg into the apple mixture for a warm, spiced flavor.
- Berry Apple Crisp: Mix in a cup of fresh or frozen berries for a burst of color and flavor.
Storage and Make-Ahead Instructions
Want to prep your dessert in advance? Here’s how:
- Make-Ahead: Prepare the apple filling and topping separately, storing each in the fridge for up to 24 hours. Assemble before baking.
- Storage: Cover leftovers tightly and refrigerate for up to 3 days. Reheat in the oven or microwave before serving.
- Freezing: You can freeze unbaked apple crisp for up to 3 months. Just bake it from frozen, adding extra time to the baking process.
Frequently Asked Questions
Got questions? We’ve got answers!
- Can I use frozen apples? Yes, frozen apples can work, but make sure to thaw and drain excess moisture.
- What’s the best way to peel apples? A vegetable peeler or a sharp knife works well; just be careful with the skin!
- How do I make my apple crisp crunchy? Ensure you have enough oats and butter in the topping for that perfect crunch.
- Can I make this gluten-free? Absolutely! Substitute regular flour with a gluten-free blend.
- What should I serve with apple crisp? Vanilla ice cream or whipped cream are classic choices that pair beautifully!
- How can I tell when my apple crisp is done? Look for a golden-brown topping and bubbling filling.
- Is it okay to leave apple crisp out overnight? It’s best to refrigerate leftovers to keep them fresh.
- Can I use other fruits? Yes! Feel free to experiment with peaches, cherries, or even rhubarb.
Nutritional Tips and Dietary Adaptations
Want to make your apple crisp even healthier? Here are some tips:
- Reduce Sugar: Cut down on sugar by using natural sweeteners like maple syrup or honey.
- Add Whole Grains: Substitute half of the all-purpose flour with whole wheat flour for added nutrition.
- Incorporate Nuts: Chopped nuts not only add crunch but also healthy fats and protein.
Essential Equipment Recommendations
Here’s what you need to make this apple crisp a success:
- 9×13 Baking Dish: Perfect for even baking and serving.
- Mixing Bowls: Essential for combining your ingredients.
- Sharp Knife: For slicing apples with precision.
- Measuring Cups and Spoons: Accurate measurements lead to tastier results!
Serving Suggestions to Elevate Your Dish
Want to take your apple crisp to the next level? Try these serving suggestions:
- Top with Ice Cream: A scoop of vanilla ice cream is a must for that delightful contrast!
- Drizzle with Caramel: A drizzle of caramel sauce adds sweetness and a touch of elegance.
- Serve with Whipped Cream: Light and airy whipped cream complements the warm dessert perfectly.
Final Thoughts: Let’s Make Some Memories!
This ultimate apple crisp recipe is more than just a dessert; it’s an experience waiting to be shared! Whether you’re enjoying it solo or with loved ones, every bite is a celebration of flavors and warmth. So, gather your ingredients, get your oven preheated, and let’s create something unforgettable together. Your kitchen is about to become the heart of your home, and trust me—this dessert will be the highlight of any gathering!

The Best Apple Crisp Recipe
Ingredients
Method
- Preheat oven to 375°F (190°C).
- Melt butter, sauté onions, then stir in flour and cook briefly.
- Whisk in heavy cream, salt, pepper, garlic, and paprika; cook until slightly thickened.
- Layer potatoes in a greased dish, pour half of the cream mixture, sprinkle half of the cheese. Repeat.
- Cover with foil and bake 45 minutes, then uncover and bake 15-20 minutes until golden.
- Let cool briefly before serving.
Notes
Loved this recipe? Save it to your favorite Pinterest board so you can easily find it later! ✨
